The Beginner Guitarist
Adults, however, end up picking up an instrument usually after years of regretting not learning one as a child, or simply because they’ve enjoyed listening to music for so long they want to take a crack at it themselves. Regardless of why you may have decided to start playing music, the next step is deciding what instrument to play. Guitar being one of the most popular instruments in contemporary music is the first choice for many. The sounds of acoustic and electric guitar are everywhere: radio, TV, internet; and a lot of people start playing music because they’ve specifically fallen in love with the guitar. The truth is that it’s one of the most versatile instruments out there, and can be heard in virtually every genre of music.
Because guitar is such a pervasive instrument, it can also seem like a lot to take on. Should I start with acoustic or electric? What should I start learning first? Should I take lessons? And on and on and on… In the following articles we’re going to help answer some of these beginning questions and hopefully get you started on a path towards enjoying the guitar to the fullest. Like learning anything that requires technical ability, you want to make sure you cover the basics before trying to move onto playing Hendrix or Segovia. Trying to learn difficult pieces right off the bat can be demoralizing, so you’ll want to start simple and work up to playing the harder stuff. No matter if you think you’re a natural or not, the guitar will reveal itself to you with patience, practice and perseverance.
Holding the Guitar
The first thing you’re going to do with a guitar is pick it up and hold it in one way or another. It may seem pretty self explanatory, but I’d like to go over just a few of the basic positions.
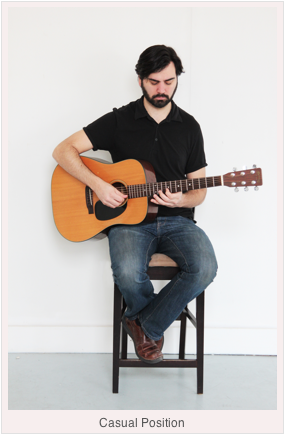
The first position can be referred to as the “casual position”. This is when the indentation on the guitar body is resting on your right knee (opposite for lefties) and the neck of the guitar is only slightly tilted up towards the ceiling.
For the “classical position” the body of the guitar is going to rest in between your legs, and the angle of the neck will be almost at 45 degrees from the floor. Classical guitar can get very technical very quickly, so if you’re thinking about learning it, I highly recommend finding a teacher and a book that is specifically about classical technique. Mostly this position is a great way to finger-pick without straining the picking hand unnecessarily.

The third position is “standing” and that requires a strap. It’s good to be able play the guitar standing up because that is most likely the position you’ll use when performing for an audience, with the exception of classical recitals and more acoustic gigs. I recommend practicing half the time sitting down and half standing up so you get used to both ways of playing. Make sure that the strap isn’t too tight or too loose. You want to be able to freely use your picking hand and your fretting hand without straining your wrists.

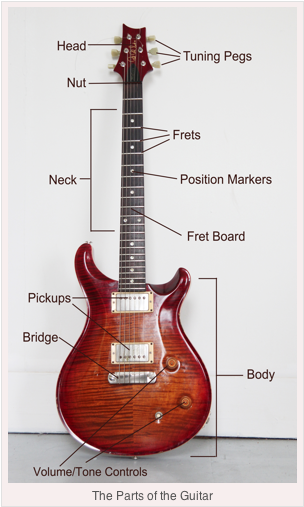
The Parts of the Guitar
You can refer to this diagram at any time, just in case some of the guitar lingo gets confusing:
Using a Pick
I am always an advocate of learning how to play with a pick from the very beginning, even if you think you might want to do more finger-picking later on. As a beginner it’s important to learn how to pick one string at a time. The finger-picking style is a bit more complicated and can easily be learned after one can play proficiently with a pick.
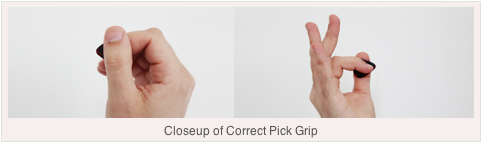
To hold a pick properly, simply hold your picking arm out in front of you so that your thumbnail is facing the ceiling. The pad of your thumb should be resting on the side of the first segment of your index finger, forming somewhat of a donut hole in between the two fingers. Let your other fingers follow naturally, and then slide the pick in between your thumb and index fingers. Almost all of the surface area of the pick should not be visible except about a quarter of an inch at the very tip. It may seem easier to have more of the pick showing in the beginning so it’s easier to pluck the strings, but this is a bad habit to get into as it will make it harder to play faster passages later on.
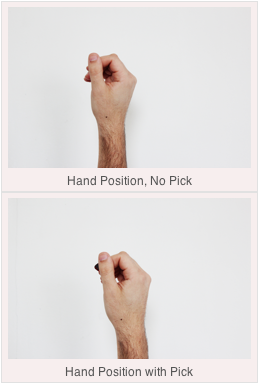
These closeups show the way the pick is held between the thumb and index finger as well as where the index finger is placed from the back view. I like to think of the pick as an extension of the index finger:
Now bring your arm back so that it is parallel with the body of the guitar and the tip of the pick is perpendicular to the strings. The portion of your arm right above the elbow and below the armpit should be resting on the body of the guitar. Don’t bend your wrist on your picking hand! This can lead to injury and is a very bad habit to get into.

Ok, I know that was a lot, but now your ready to make some sound!
Plucking the Strings
So now that we’re all set holding the guitar and the pick properly we’re ready to do our first exercise. When you pluck a string without using your fretting hand this is called playing it “open”. The 1st string of the guitar, or the High E string, is actually the string that is closest to the floor. When I say high or low, I’m actually referring to the pitch of the string (how high or low the note sounds). The thinner the string the higher it sounds, and the thicker the string the lower it sounds. This may seem counter-intuitive at first because your High E string is the string closest to the floor and your Low E String is closest to the ceiling. Don’t worry, you’ll get used to this very quickly.
So pluck the High E string a couple of times, and do so trying to let the string ring out. Do not let the pick rest on the string before picking it each time, or it will cause an undesirable period of silence between each pick. The picking of the string is one motion. Now go down to the 2nd string and do the same. Continue down until you’ve covered all the strings down to the Low E String (6th string). After you get a feel for plucking the strings open, then do the same exercise trying to keep a steady rhythm.
Below is a diagram of the string names and numbers. It’s important to memorize this as it makes reading Tablature and Chord Grids easier down the line.
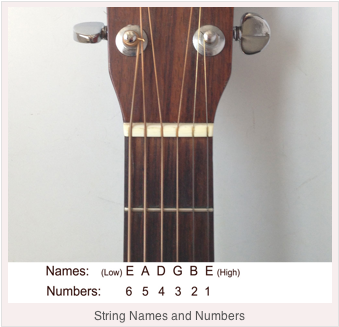
Here’s a little pneumonic device for remember the string names from lowest to highest:
6-(E)very 5-(A)pple 4-(D)oes 3-(G)o 2-(B)ad 1-(E)ventually
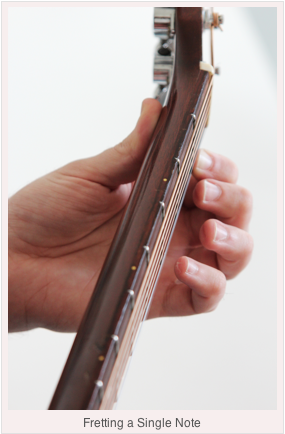
Playing Notes with your Fretting Hand
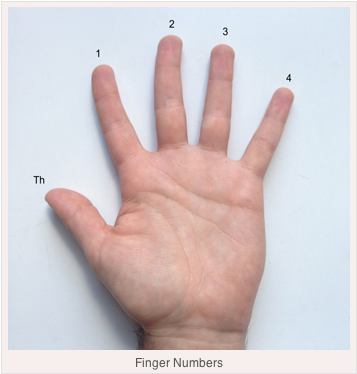
Before we start, here are your finger numbers for the fretting hand. The thumb is not included because it remains behind the neck for support.
Now we’re ready to start playing notes up and down the neck with our fretting hand (this is your left hand for right-handed players). The goal is to be proficient with all four fingers on your fretting hand, but we’ll start by using finger number 1 as an example.
Press your index finger behind the first fret, on the High E string. This is the part that may hurt your fingers a little bit in the beginning because it takes some time to develop calluses. It important to press right behind the fret without going over in order to get the cleanest sound. Keep your fingers curved, and press down with the very tip of your finger. Keep your wrist releatively straight and in a natural position.
Try to keep your finger relatively straight up and down (perpendicular) with the fretboard, and again, press down with the very tip. Notice that the pad of your thumb is behind the neck, right below the center. It is this pinching action between your thumb and fingers that creates the tension to play notes clearly.

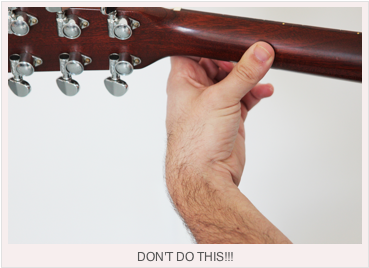
Also notice that the thumb is pointing away from you. This respects the natural shape of the hand and is important for avoiding injury.
Avoid pointing the thumb towards you and bending your wrist as seen below:
Keep your first finger behind the first fret and pluck the High E string with your right hand in the same manner as discussed in “Plucking the Strings”. You’ll notice that the pitch of the note sounds slightly higher with your finger on the first fret than when you pluck it open. Continue up to frets 2, 3, 4 and so on… As you cut the string off with your finger at higher numbered frets, the pitch will get higher because the string is getting shorter. Remember to play right behind the fret for the cleanest sound. Experiment with figuring out melodies that you already know on one string. Start using the rest of your fingers, and explore the lower strings as well. As you get to the lower strings you may find it a little harder to get a good sound. Don’t worry this is a very normal. Just make sure your not contorting your wrist to compensate. Instead, try curving your fingers a little less.
Using your picking hand and your fretting hand in conjunction like this is the foundation of how you play everything on the guitar. I mean everything! We’re going to discuss how to read tablature and start playing some simple riffs in the next article. I’ll also give you some exercises to stretch and strengthen the fingers on your fretting hand.
Joseph Primavera
I teach Guitar, Bass, Piano and Ukulele. I am a music educator, performer, composer and producer with over 15 years of experience. Since obtaining my Bachelor’s of Music in Performance from Temple University in 2007, I have been teaching private music lessons in the greater Philadelphia area to students of all ages and skill levels. My teaching style focuses equally on technique, theory and improvisation. I like to tailor the lessons to each individual student's goals and interests, all while focusing on the music that they find interesting and inspiring. In 2002, I was one of only two guitar players in Pennsylvania chosen for the Pennsylvania Governor’s School for the Arts. In 2010, I recorded the music for a full length documentary called “Libertopia". In 2011, I co-lead the launch of a recording program at The Hill School in Pottstown, PA. Since graduating with my degree in jazz performance, I have been featured as a guitarist performing in a variety of genres, and have contributed guitar to multiple recordings, including works recorded at Miner Street Recordings in Fishtown. In addition to guitar and music in general, I have been teaching audio engineering, production and mixing. I have also had a key role in the production and engineering for the albums of many local bands, including Juston Stens (former drummer for Dr. Dog), TJ Kong and the Atomic Bomb, Grubby Little Hands, and The Looks of It (my personal project). In 2009 I founded Philly Music Lessons to bring a unique form of music education to my own neighborhood and to Philadelphia at large. Whether you are just starting out and want to learn some of your favorite songs or preparing for a college audition, I have the tools and experience to help you achieve your musical aspirations. Schedule a Lesson